Monday, December 31, 2012

Post NYE Beauty secrets

Yes yes, New Year's Eve is all about celebrating with friends and family, creating new resolutions to better yourself, blah blah blah..

For most of you it's a good excuse to drink loads of champagne and party like it's going out of style! I intend to partake in some celebrating myself :) 

In case some of you need to work the next day, or have a brunch date, or just need to leave the house-- Here are some helpful hints for that puffy, exhausted face :) 

Things to help the night before...

1. WASH YOUR FACE! 
No matter how tired you are, it is so important! Especially since more makeup is typically worn for the occasion (as stated in my previous blog post here), and you've been drinking, dancing, eating, and sweating, it is a bacterial haven! 
Last NYE, I came home at 4am and before I even looked at my bed, I headed straight to the washroom to wash my face of the evening! It'll make you feel so much better in the morning and save your skin!

2. Take some aspirin.
If you've had too much alcohol, it'll save your life (and your headache). If you have some advil PM, it'll help you get that extra beauty rest you need!

3. Wash that aspirin down with lots of water. 
When I come home and if I've had more alcohol than I intend, I try to drink a quart of water (4 glasses) before bed. The aspirin is a lifesaver in itself, but if you hydrate before bed, you wake up feeling SO much better! Not only that, your skin will thank you. 

Rise and Shine...

1. More water!
First thing's first, start your day with another big glass of water! Hydration is key to feeling and looking better. Coconut water is a great source of hydration as well. 

2. Cold Spoons. 
Notice some puffiness around your eyes? Place some cold spoons over them and relax for 10 minutes. Another trick to remember to do, the next time you have green tea, save the tea bags. Placing cold tea bags on your eyes will help with the swelling as well. Not to mention the helpful antioxidants and caffeine boost your skin gets!

3. Hydrate your skin.
How'd you know I was going to say that? 
After your cold spoon remedy (or splashing your face with cold water if you don't have puffiness), use a good moisturizer followed by an eye cream.

And remember, my best tip to distract from tired eyes-- LIPSTICK! Throw on a bright lip color and put on some shades! 

Hope this helps you post celebration! You want to start the New Year right! Practice good habits for 2013! 
Happy New Year everyone! 
xoxo Jen

Sunday, December 30, 2012

New Year's Eve Makeup!

NYE
The best reason for glitter!

NYE seems to be the most appropriate time for ladies to really experiment and play with their makeup looks! It's always fun to see what people do. 

I, myself am a lip girl. I always rock bright colored hues on my lips. It's what makes me feel good, sexy and fun :) 
But whenever NYE comes around I usually play up my eyes more as well. This magical night is a time when women can throw all the rules out the window and go BIG with their looks. 

Here's a sample of what I did last year: 
*excuse the poor photo- via iPhone :) 


Glitter lids with kohl rimmed eyes, lashes and of course, red lips :) 

It was SO fun to wear. It felt super festive and special because I never wear that type of makeup day to day. 

Unsure of what look you want to do this year? Here are some classic combos and other fun looks you which you can't go wrong!

Retro Lovely: 

*photo by Peggy Clements Hair and MU: Jen Brown

You can't go wrong with a classic Cat Eye and Red Lip. This look is timeless and will never go out of style. I feel like it's so simple, but for someone that doesn't wear a lot of makeup, it makes quite the impact!

Favorite Products to create this look: 

Metallic Hues:
Soft Silver
*photo by Chris Rucker, Model: Stasia, Hair and MU: Jen Brown 

I LOVE metallics. 
I love gold, silver, glitter, copper, you name it, I'll wear it! 
The shimmery sheen you get from these shadows are perfect for evening and feel extremely festive! They catch the light beautifully and will work with any eye color. 

Favorite products to create these looks: 


Glamorous Gold

*Photo by Chris Rucker, Model: Katie Jens, hair and MU: Jen Brown

*Photo by RB DelRosario, Model: Katia, Hair: Timea, MU: Jen Brown

Smokey: 
There are so many variations of a smokey eye it's kind of ridiculous! 
Whenever I get a request for a smokey eye, I decide the type by their eye shape, color, lid space, etc. 

Here are a few styles that have that smokey drama:
#1
*Photo by Bryan Whitely, Model: Isabella, Hair & MU: Jen Brown

Great example of a soft smokey eye. Keeping the darkest shadows on the outer corners and keeping it light on the lid. 
#2

*Photo courtesy of my iPhone :)

Example of a soft/subtle smokey eye. Keeping all the dark liner and shadow on the lid below the crease. 

#3a
*Photo by RB DelRosario Model: Brittney, Hair & MU: Jen Brown

 These two photos are great examples of very dramatic smokey eyes. The top photo incorporates shimmer tones and silvery hues, while the photo below shows a very dark smokey eye with a soft highlight on the inner corner. Both extend out beyond the natural eye. 
#3b
*Photo: Bryan Whitely, Model: Katrina, Hair & MU: Jen Brown

 #4
*Photo: Chris Rucker, Model: Allie, Hair & MU: Jen Brown

Here is a sample of creating a crease with a smokey eye. 

Favorite products to create a smokey look: 


Hope this helps to inspire some playful makeup for NYE! 
Have a fun, safe night out tomorrow! 

xoxo Jen


Tuesday, December 11, 2012

Making a comeback

Hello friends!
I'm finally making my blog comeback! I am making it a New Year's resolution to be better about creating posts and following through with my ideas :) 

Winter is finally making it's appearance here in Chicago -- yes, there were a few flurries today! I figured it called for some wintertime survival tips! Things that will save your skin and some time :) 

One of my favorite things about the cooler months, is bringing back my beloved head scarf. Back when I was a wee little babe, I would wear my pink and gold head scarf paired perfectly with red lipstick EVERYDAY!
No joke. 

So today, with my dirty hair, I was able to bring it back! 


In the summertime while it's hot and humid, I like all my hair off my face- especially when I'm working. So I will rock the top knots and braids (thank goodness they were so IN this year!), but when it get's chilly like this, I prefer the scarf.

I literally tie it underneath my hair, pull all my hair to the side with the knot of the scarf, and roll it into a bun. From there, I wrap a hair tie around it and VOILA! 

Easy, cute and WARM!

Now for your skin, 
I've preached about the importance of exfoliation (especially in the winter months- read about it HERE), but another tip for hydrated winter skin, is a good hydration mask. 

There are many masks you can use on your skin for different needs (clear pores, oxygenate skin, exfoliate.. etc), but for winter, I highly suggest using a hydrating mask, especially for those with drier skin. 
I have combination skin for sure-- super dry in some areas and oily down the T-zone. But in the winter, I can get dry patches. I especially need extra hydration under my eyes. 

I just purchased the Burts Bees Intense Hydration Treatment Mask and it is awesome! 

Photo courtesy of Burts Bees

It makes my skin feel like silk! It is a mask you don't rinse off-- so it's SUPER hydrating. You wipe it off with a tissue and allow the rest to absorb into the skin-- like your night cream. I love it!

There are so many different types you can buy, you might even be able to get a sample to try before buying if you go to the department store. 

Another quick fix you can carry on the go is Evian Facial Water Spray

Evian photo courtesy of Nordstrom.com

This spray is water from the French Alps that is said to have a plethora of minerals that are easily absorbed by our skin. 

It is often used as a form of re-hydration throughout the day. 
I LOVE it. 

It's perfect for a quick pick me up if you're feeling dehydrated or just need a boost before your night out straight from work. It refreshes and brightens your skin instantly. 

This is probably one of the best products to carry with you when you fly! Flying really dehydrates your skin, so spritzing this instantly refreshes and wakes you up! 

I hope this helps your winter woes--at least some of them :) 

XOXO Jen


Monday, September 17, 2012

Picking the right foundation

Yay Foundation!

I think one of the biggest struggles for most women when it comes to makeup, is foundation. It is, after all, exactly as it's named: The Foundation of your Makeup

If your foundation is off, the whole look is off. Whenever I see women with mismatched foundation, that seems to be all I can notice! It distracts from whatever eye makeup or lipstick you're wearing-- And that is NOT good!

I was inspired to write about this because I've been noticing more and more of my clients struggling with finding a foundation that matches perfectly.

I was recently giving a makeup lesson to a beautiful client of mine, when I really noticed this issue. We worked on the eye makeup together and then moved onto the foundation... I could tell by the bottle that it was probably a little light, but let her put it on anyway to see. 
As she started applying, I asked if she thought it was a little too light... She immediately exclaimed, "YES! I asked the sales people if they thought it was too light and they said it was a little light but the next shade is going to be too yellow."

WRONG!!! 

I was so frustrated at the thought of this salesperson having their customer (my client) purchase a foundation that didn't work for them just so they could make the sale! 

If you are looking at a specific brand, and they don't have something that matches perfectly, then try another brand! Some brands have a wider range of colors than others. 

So here are some tips to keep in mind....

1. Go with your gut! 
If you have a salesperson trying to sell you something and you feel like it doesn't work- don't buy it! Try another brand, ask another artist for help, or come back another day. 

2. Match foundation on your jawline.
Don't use your hand! You want to make sure the foundation matches the face and blends seamlessly into the neck. Sometimes I'll also check the foundation on the chest, because you really want to make sure your face and neck blend into the chest. No one wants that two toned look :) 
When testing, you shouldn't be able to see where you put the foundation-- it should be a seamless match. 

3. Undertones.
Think about your undertones. This is tough for a lot of people. I definitely struggled with it when I first started, but now that I've done it so many times, I can spot it immediately. 
Finding your undertones will help to choose the right foundation because you generally want a foundation that will work with your tones, not against them. If you choose a cooler foundation and you're more olive, this could look muddy.

One quick trick is to look at the veins in your forearm. Are they more blue or green? Blue usually indicates that you are cooler toned (pink) and Green indicates warmer (yellow).
Sometimes this trick is tough to see, so think about what looks better on you, gold (warm) or silver (cool) jewelry. Also think about the clothing you wear. Are there colors that look great on you? Maybe it's blues and purples (cool). If it's reds, oranges, corals you may be more warm.

4. Can't find a match? 
I will admit, sometimes it really is difficult to find a perfect match. I urge you to keep searching! Worse comes to worse, if you really can't find something you can always mix shades or tint something that 's slightly too light with a bronzer. Just make sure this shade is the closest possible, and not 3 shades too light! 
----------------------------------------------------------------------------------------------------------------------------------

In the end, I actually had a foundation in my kit that worked perfectly for her (without any mixing or tweeking), so I urged her to return the foundation (always remember you can return/exchange just about any beauty product!), and buy a new one. 

Beauty products can be expensive and sometimes tough to find the right shade. Foundation especially is very delicate, but most cosmetic companies allow returns/exchanges. Foundation can be pricey, so don't just settle! Always search for the perfect match! 

Even if you are on a budget and buy a foundation in the drugstore (which you sadly can't try on in store), if you take one home and it doesn't look right, be sure to examine what's missing. Is it too light? Too orange? take it back to the drugstore with your receipt and ask to exchange it.
 Compare that shade to the others and try again. 

This can get a bit tough or exhausting--that's usually why I urge clients to splurge for the real deal. Even though it can be up to 3X's the cost of drugstore brands, it's much easier to find the shade if you can try it on in store! And, it'll last longer :) 

I hope this helps! With Summer coming to an end, I know some of you are on the market for a new foundation :) 

xoxo Jen


Wednesday, September 12, 2012

Fall is in the air....

Hello lovlies!

It's definitely been too long since my last post! So much has been going on this Summer. I've been working on many exciting projects!

I did some catalog work for Kmart! That was super fun. I worked with a lot of familiar faces on the crew and some of the talent. Here's a behind the scenes snapshot of me with one of my favorite gals--Iris Kohl--Model/actress/supermom.


These ads should be running in their Holiday catalogue and in store cutouts! Will post when they come out :)

Another funny little fact: Iris and I worked together about a week later on another print ad! Hilarious! That one will be in CS Magazine Chicago--shot by one of my favorite photographers, Jorge Gera. That'll be posted as soon as it's out as well. 

Since we are on the subject of Print ads... 

Factor Model Management chose to run a full page ad in TCW (Today's Chicago Woman), of a photo I worked on with my another favorite and good friend of mine--Bryan Whitley
Here is the photo they'll use....


Should be out in October-- Keep an eye out! xo

One other super fun project I worked on was a music video for an up and coming Chicago band, Summer Girlfriends. The ladies of this all female band are so super sweet, fun, cool and talented! And, we're all neighbors! haha

The day didn't go as we'd hoped... Dave Rentauskas (our lovely director/cinematographer/diet coke drinking enthusiast) had an elaborate outdoor shoot planned. Mother nature didn't seem to care, as it POURED the entire time! Let me fill you in... it hadn't been raining much here in Chicago--it was actually kind of a drought-- and then, of all days to POUR rain...

It was comical.

We had an incredible team on board, pinning tarps and holding umbrellas over the lights as they got drenched! But it was incredibly memorable and fun and the video will be amazing.

here are some behind the scenes shots of the day... Video to come shortly...


Interior shots first...


Lovely hair and wardrobe standing in the rain! It was raining hard!


 Dave's vision brought to life...


Between takes so the girls wouldn't get drenched!


My beautiful hair stylist Nora! Everyone ditched their shoes and drank some beer! 

The song we made the video to is: "Goth Beach Party". Be sure to go to your Spotify and search for them--even after hearing the song for 300 times, I still love it! 

The makeup, hair and wardrobe was all goth inspired, but pretty goth. So it was a really fun job for me to do dramatic eyes and super dark berry lips (which are trending hard for fall this year!) 

Aside from that...
It's been a lot of the usual work. Test shoots and weddings, private lessons and Pinups. All in all, I cannot complain

Super excited to see what Fall has in store for me! Stay tuned, many exciting things to come!

xoxo Jen


Sunday, May 20, 2012

Airbrush Makeup

Makeup artists have been using airbrush makeup compressors for many years. While these fabulous tools have been around for so long, everyday women are noticing them more and more. Companies are starting to advertise more for personal airbrush kits as opposed to just the professionals. I'm here to fill you in, and you can decide: 

Is it worth it? 

Some of you may be curious about airbrush makeup especially with the hot summer days coming up. You may be looking for a nice, smooth finish that will last through the day. Brides LOVE the airbrush makeup because it's a chance for them to feel ultra glam and pampered, but also to feel secure in knowing it's not going anywhere!

I have to be honest, I fought against getting an airbrush for a long time. Crazy because I love it now, but for a while I just kept telling myself.... 
It's too expensive.
It's just another thing to lug around.
I can get the same results by applying foundation by hand.

While all those things ring true, I am so happy to own one! For my business it's crucial. Brides are crazy for it, HD television is all over, and let's just face it--there are some things that are nearly impossible to cover flawlessly ;) 

Airbrush makeup is applied using an air compressor which creates a steady flow of foundation that you control using the trigger on your "brush" or "air gun." The application can be as light or as heavy as you desire. So you can apply more product in areas that need a little more coverage, but it will blend seamlessly and won't give you that cake-y look. 

Airbrush is a very clean and germ free application. The foundation goes straight into your air gun which is cleaner than brushes and sponges which can hold a lot of bacteria (be sure to clean them between uses!).

Another perk about the airbrush makeup: The makeup is water resistant. So sweat and tears bare no threat! Granted, you will still need to blot as your skin is still breathing and may still produce oil, but it won't ruin your makeup. 

While I do airbrush often, I also do most of my work by hand. Partially to keep in good practice, but also because I enjoy it. It is definitely possible to create a flawless/long lasting look without an airbrush--It's just a matter of taking care of your skin, and applying the right products correctly. Many posts and videos will be made to showcase some options for you guys :)   

In Conclusion....

As with anything else, airbrush makeup is just another way apply makeup. Everyone has a preference for themselves based on what works best for them and their skin, what's easiest/fastest, and of course convenient. 

Foundation is definitely something that you should be taking the time to figure out! It is the base of your makeup routine and when done wrong, offsets the entire face! So experiment! Go play with different types of foundations and application techniques. Trial and error is the only way you'll learn :) 

Hope this was helpful! Everyone enjoy your Sunday! 

xoxo Jen


Tuesday, May 15, 2012

Vacation is over...

Time to get back to reality! 
Vacation was a blast and oh-so-necessary. I've recently confirmed just how important it is to take a break and treat yourself, even if it's just for a day :) 

That being said, It's time for me to get back on the blogging train! I've been gone for 10 whole days and now home for 4 without a single post. 
I apologize. 

This is an update post! 
Check out some of the exciting things that are happening/happened/soon to happen!

I went on Vacation: DUH
*The boyfriend and I*

And guess what? I didn't wear a stitch of makeup! My skin took a long break and enjoyed the natural elements of sand, clean air and salty ocean water :) 

But before Vacation...
I did some test shoots with Bryan Whitely.


 *Alexis with Factor Women Chicago*


*Laura Catherwood with Factor Women Chicago*
Photographer: Bryan Whitely
Hair and Makeup: Jen Brown

My work made the cover of Latino Leaders Magazine!

 Print Cover
 Online Version


-Individual Head Shots-
sorry they're small-don't have the hi res yet!


Photographed by AJ Kane


I have also become an Associate in the bridal department of the fabulously talented makeup artist: Nika Vaughan. <--Click her name to see her work and my bridal work! It even includes a collaborative shoot we worked on. 

A big collaborative Bridal shoot I worked on in April was featured on Ruffled Blog. Here's a sneak peak of the 80's themed Wedding!


--Full shoot and vendor list can be found on the Ruffled Blog--

And my biggest project as of late... 
My newly updated and designed website! 
I had a great website before from my good friend Michael, but it was in Flash. I wanted to design and create a new HTML style site so people could view it with their phones. So here it is, the site I have BUILT and LAUNCHED myself!! 


Last but certainly not least, I bought a bigger memory card for my camera. This is important because that means I can start filming! yay! Tutorials are so so close, so get ready! 

In the meantime, if you have any comments, suggestions, questions... Please feel free to leave them in the comments section. I'd love to hear what you'd love to learn! :) 

xoxo Jen


Monday, April 23, 2012

Hello lovelies! 

I have been so terrible about new posts this month and I apologize! Things have been insanely busy for me work wise (thank goodness :)), and now I'm gearing up for my vacation

As I was prepping a mental list of what to take, I thought it might be fun to share with you my vacation makeup must haves, and then show a few ideas on how to use them. 

Now I like to travel light when it comes to makeup, especially when I'm going to a beach. I know I'll be lying on the warm sandy beaches for most of my days and heading out to dinner in the evenings... *Swoon* 
Considering how low key this vacation is,  I only bring the essentials. So here they are!

Sunscreen: 
Obviously! I wouldn't dare let my skin see the light of that hot sun without it! Of course I'll be under the big umbrellas and wearing my big hat, but for when I venture out to the pool or ocean, I want to make sure I'm covered :) 

Moisturizer/Lotion: 
So important! Moisturizing is one of the best things you can do for yourself! Especially if you plan on being in the sun. In order to keep that golden tan, your body needs moisture to lock it in! 

Concealer: 
I hate wearing a full face of foundation in hot climates and even during the warmer months in Chicago. So a lot of times I'll just spot conceal where my skin needs a little love :) 

Red or Coral Lipstick: 
Sounds kinda silly, but it's so versatile! I can use a little on my cheeks for a soft cream blush, or throw it on my lips for dressed up evening :) Lipstick is the EASIEST way to dress up your look without a lot of work :)

Waterproof Mascara: 
Mascara is one of my favorite products! So with all the heat and water, I need to keep a waterproof one in my bag. 

Highlighter: 
I usually always have a highlighter of some sort. Currently I've been obsessed with Smashbox's Highlighter Stick! It's so portable and can be used anywhere. 

Brown Eyeliner:
I have brown because it's less harsh than a black liner. It's a nice warm tone that will work wonders for enhancing my eyes-AND-I can use it to slightly fill my brows :) 

Set Powder:
To reduce shine and set your makeup!
------------------------------------------------------------------------------------------------------------------------
These few products are the perfect standbys to achieve a beachy, flawless look. Here's how I use them... 

Daytime Venture:
If for some reason I don't decide to lay on the beach all day with sunscreen and shades only... I may put in some effort to put on a fresh face for some sightseeing or shopping.
product photos, links, and descriptions to follow

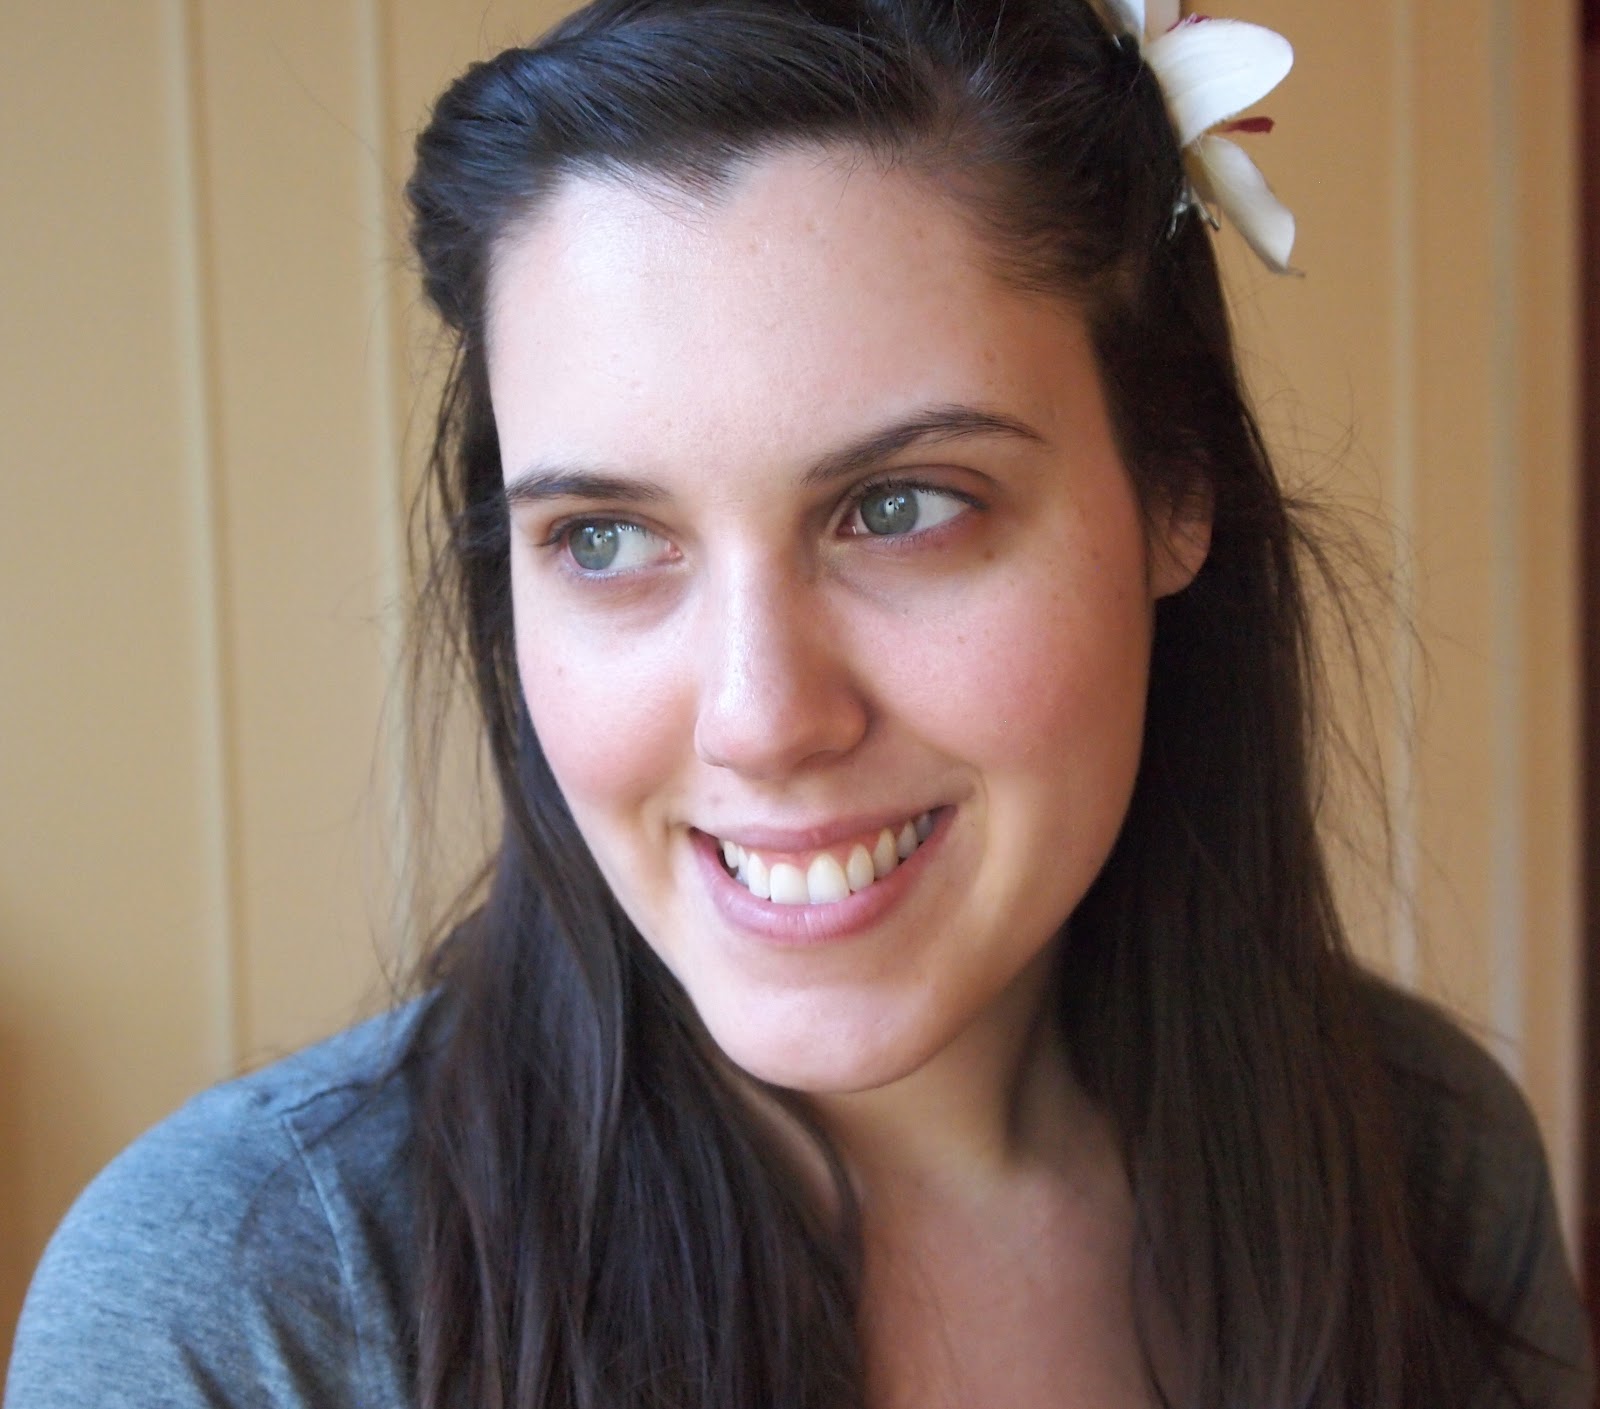
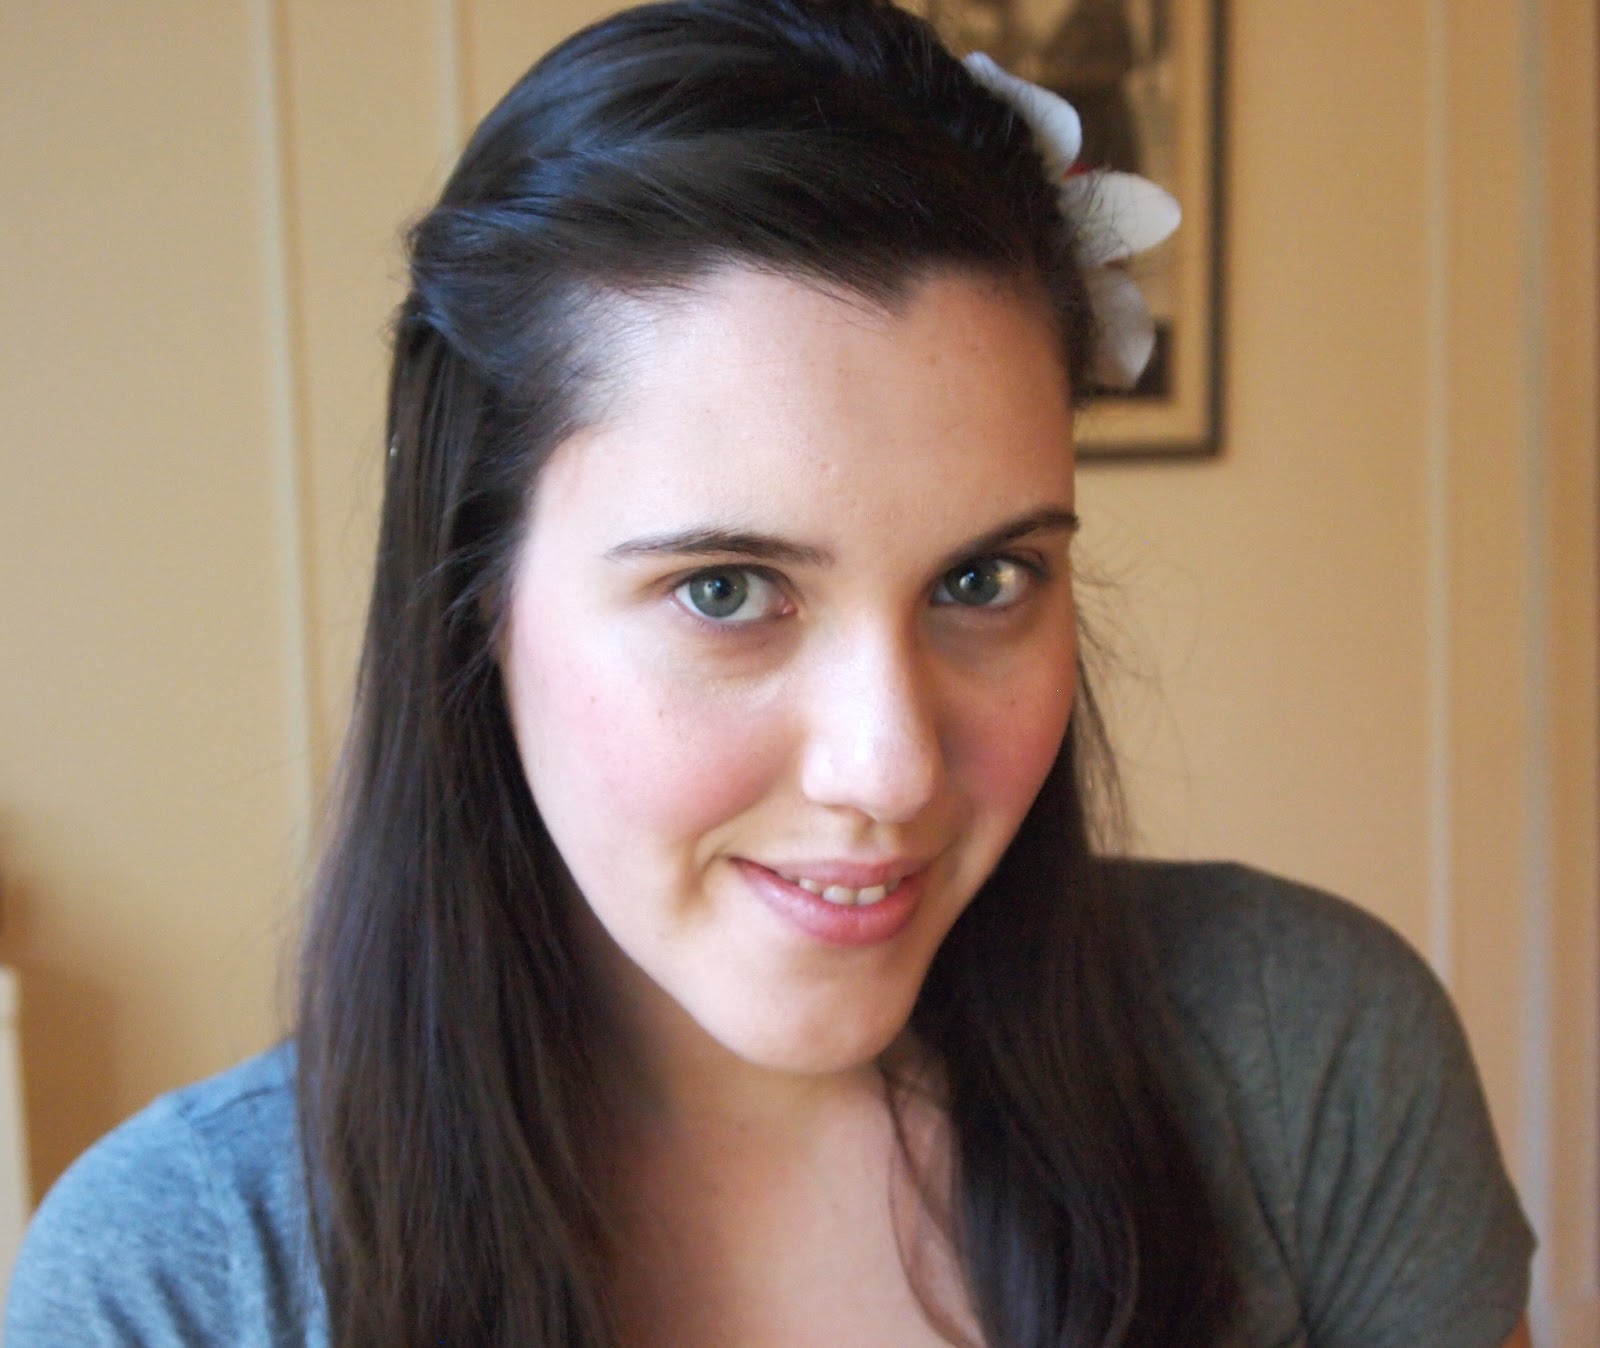
To start off: This is my beach face. No makeup.


To get the ball rolling, I apply a moisturizer with SPF all over my face.
Next, I conceal wherever needs some help... i.e.; dark under eye circles, bits of redness around the nose, forehead, and chin.


I used NARS vanilla/honey concealer palette for this. I used the "honey", or the more pink one to conceal under the eyes. This pinky tone cuts any blues/purple tones. 
I applied it with a pointed concealer brush. It's just a little more precise.


I then blended the product with my fingertips.  


Don't forget your eyelids! This dramatically brightens the eyes!

 Following the same routine as under my eyes, I used the 'Vanilla' shade (the more yellow tone) of concealer to cover any redness on my nose, forehead and chin. 


 And this is me with a spot concealed face! Just that tiny bit of concealer goes a long way. 


Now that I've created a neutralized palette, it's time to add some color! I take my red lipstick (or coral lipstick, or pink lipstick, etc...) and very lightly tap a few dots on the apples of my cheeks. 


Then I gently buff it out with my fingertips. 


I could stop here! But let's keep going. 


Take the lipstick and gently dab some color on your lips. This way they have a little bit of brightness. 


Set everything with a light dusting of powder. This will matte out our look in this humid climate!


Highlight!
I took my brightening stick and placed it on the inner corners of my eyes to help open and brighten them up, as well as highlighted my brow bone. This looks gorgeous in the sunlight!


I also took the liberty of placing a little on my cheekbones. You can put this stuff anywhere you want the light to hit and reflect :) 


Curl your lashes! Even if you look like me with a half opened eye!


Apply the waterproof mascara.


And that's it! 
So easy! But I look fresh faced, like  I just rolled outta bed looking flawless! --that'd be awesome by the way :) 


Evening out: 
One thing you should know about me, I love eating! So evenings are always spent dining in a new restaurant while on vacation. Here is how I might pull together an evening look in the heat.  

Going from the day look above, here's a quick way to bring it into the evening light....

First and easiest thing to do: Apply that same lipstick on your lips as you used on your cheeks. 

I had red on hand, so that's what I used. Depending on the night out, I may have used something a little more tropical and fun! (I have a fabulous coral and orange:)) I will have at least two different shades with me on vacay :) 


Hit those lashes with a little more mascara! This time, hit the bottoms as well. 


 Take that brown liner and softly line the upper and lower lash lines. 
This adds some definition and drama. 


This could be it. I could be done here. BUT I'm a little obsessed with brows and feel naked without them when I have all this other makeup on! 


so.... Take that same brown eyeliner and very softly fill your brows. 


what a difference huh?!


Aaaaannnddd now we're done :)


So there are two super quick and easy makeup looks you can do on your next vacation, or any day you're running late! With my schedule, I pretty much do the daytime face everyday :) 5 minutes is all you need! 

Here's what I used so you can see how portable these products are. They hardly take up any room in my bag! The Moisturizer is actually a sample from Mario Badescu, which is perfect for a trip! 


Products: 

Tools: 
My hands!
Shu eumera Eyelash curler
Stila Brushes #24 and #33

Hope you enjoyed this! Practice your 5 minute face at home. You'd be surprised to see how few products it takes to get that flawless face :)

xoxo Jen