Showing posts with label makeup. Show all posts

Monday, July 11, 2016

Festival Beauty Tips

It's that time of year again...

Festival Season! 
Music festivals, art festivals, all kinds of outdoor gatherings to enjoy the summer heat. So here are some beauty tips to look your best all day outdoors. 

Hair Inspiration

1. Braids. 
Duh. 
This is probably one of the best go to festival do's you can have! With running from stage to stage or booth to booth, in the heat, it's great to not worry about how your hair is holding up. The best part about braids? They are so versatile! You can braid small sections of hair, or try different styles of braids, or pin them against your crown to keep hair off your neck, but in a way that looks like it takes more time than you actually spent! 


So throw a quick side braid in! Nothing fancy, a regular braid is simple, chic and functional. 
Photo c/o instyle.com

This photo of Zoe Saldana looks like perfection with this braid. Leave it loose and let pieces or layers fall through. It adds a more relaxed and less severe feeling overall. 

Wanna try to amp it up? 
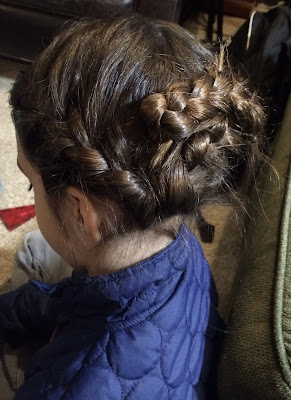
Create two side braids, and criss cross them across the back of your head and pin into place. This keeps the hair off your neck in the summer heat, and adds a lot of visual interest! Not to mention, it's super easy! Any hair novice can master this. The messier the better! 

Here are a couple photos from a shoot I worked on with a little girl-- But trust me, it looks just as cute on a grown up :) I do this hairstyle to myself and I always get a compliment and a "how'd you do that?"  


2. Wear a hat. 

Hats are a great form of sun protection and they are so cute! Best part? You don't have to worry so much about what your hair is doing! Leave it down, put it in that braid or low pony-- no one will notice if you didn't put the time in because they will be so focused on your fashionable hat. (maybe save the hat for day 2??)

Here are a couple styles I love... 

photo c/o asos.com

This sleek felt hat from Asos is beautiful. A simple silver bar detail that catches the eye is perfection. Best part?? It's $23! 


Another great option is cute straw hat. Lightweight, it's perfect for that summer heat. Comes in lighter tones as pictured, or a black patterned version is available as well. 
$34


Makeup Inspiration

 Keep it light and easy. 
Think low key. 
You're going to be outdoors, in the sunlight all day. Minimal makeup is best for this type of event! The more you pack on, the more you have to deal with smudging, melting and looking over done. Festivals are great because they are very low key. So go with it! 

Some ideas...

Can't separate yourself from a full foundation face?? Try opting for a tinted moisturizer. You'll still get some coverage, some SPF and it's lighter so you won't be too made up. 

Simplify your routine. 
Instead of making up a full eye and contouring your face, simplify your routine. Think smaller. Maybe you put a nice liner on, with a pop of color on the lip? 
Or a little swipe of a soft shadow with some mascara and gloss? 

Bronzer is your friend. 
Adding a pop of bronzer along your cheekbones will instantly create that contour without feeling/looking heavy and like you tried! It's a more delicate and event appropriate way to get that definition while adding a little sun kissed glow. 

Hydration and SPF
You knew I had to mention it! 
Be sure to drink plenty of water before you head out, and try to have a bottle every hour or two. All that alcohol and sun can wipe you out. 

And of course Apply that SPF before you leave the house! But be sure to have some on hand as well for re-application. You need to do so every couple of hours :) 


Have fun at all your festivals this summer! 
Have a great hair or makeup tip from your adventures?! Feel free to share in the comments below! 


Monday, July 4, 2016

Happy 4th!


Ah, the 4th of July... 
One holiday we often look forward to for the obvious perk that it occurs right in the middle of summer! 

That said, many of you will be outside for the day, so before you head out to your holiday bbq, be sure to check out these fun makeup tips! 

Sunscreen it up. 

Most of you will be enjoying the sunshine whether you're on the beach or in a backyard or a park, you'll need to be sure to wear your sunscreen! 

Apply a lightweight sunscreen before your makeup- one of my favorites is by Vichy.

One thing to keep in mind-- 
you must reapply! 
So after getting your 4th of July makeup look on point, be sure to have some of this Sunscreen Makeup Setting Spray on hand. It smells great and is a perfect way to re-apply sunscreen without ruining your makeup! 

Don't forget about the rest of you! 
Be sure to apply sunscreen to your neck, chest, and anything else visible to the sun :) 

Beat the Heat. 

Be sure to wear lightweight makeup products! Not only will they feel better on your skin in the hot weather, but they won't melt off your face :) 

Use waterproof makeup-- Liners and mascaras tend to travel in the warmer temps, so be sure to pick a good waterproof liner, like this one from Makeup Forever. 

Onto the fun stuff... 
Here's a fun, holiday inspired makeup idea for your July 4th bbq's! 

Incorporating Red, White and Blue

One of my favorite ways to incorporate all 3 colors into my makeup routine without being too costume-y is to use small amounts of each. 

Red: 
The most classic and probably obvious would be to wear bold red lips! 

White: 
I use small amounts of a soft white shimmer shadow as a highlight. Place on the inner corners of the eyes and maybe a touch under the brows. 

Blue: 
Go for that classic All American look by sealing the deal with a cat eye- but use Blue liner instead! I often lean towards a navy liquid liner but you're welcome to use something a little brighter. 

I just love this classic look adjusted to a very festive 4th of July color scheme. 
If you have a fun and festive 4th of July look, feel free to share! Would love to see what you come up with! 
Have a safe and fun 4th! 


Sunday, June 19, 2016

Mature Skin


Oh the joys of getting older...

I see a lot of women struggle with their makeup routines as they get older. 
Many have stuck with the same routine from their teens and early twenties. 

While it may seem harmless, not updating your makeup look, you could be aging yourself even more! 
So how can you look your best with each passing decade? 
Love your skin, and update your makeup routine to fit your lifestyle.

So let's recap with some Do's and Don'ts for mature skin makeup...


*photo by Clayton Hauck, h/mu: Jen Brown

DO...
Use hydrating products. 
One of the downsides of aging skin is a lack of moisture. It's very important to always moisturize before makeup and to use lightweight, hydrating products. These products won't settle into any fine lines and will help to keep skin bright and luminous.

Foundation: Try any of these beautiful foundations...

Makeup Forever Face and Body Foundation: 
Light to medium Coverage


*photo c/o makeupforever.com


This very light weight, hydrating, water based foundation is perfect for very light coverage to medium coverage. Built to layer on the skin, this has a satin, natural finish-- creating the look of dewey, healthy skin.
$43

Makeup Forever Liquid Lift Foundation: 
Fuller more Medium Coverage

*photo c/o makeupforever.com

An oil free makeup that "lifts" the skin and fills fine lines. It has a fuller more medium coverage.
$44

Cream Blush: I always opt for a cream blush on my clients- it's a soft/natural wash of color and again, the creamy texture won't settle into any fine lines and help to keep a glowy, youthful effect.


Tarte Cheek Stain: 

*Photo c/o tartecosmetics.com

Super easy application of this sheer based cheek color that lasts for up to 12 hours. 
It has a natural looking tint that brightens. Apply directly from tube onto the apples of the cheeks and use your fingers to tap it up to the cheekbones. This can be  used on the lips too!  *
$30

Concealer: Choose a hydrating, light weight concealer like...

Eve Pearl Pearlfx Liquid Salmon Concealer and Eye Brightener: 

*photo c/o evepearl.com

Lightweight liquid concealer that covers the toughest dark circles.
This concealer is layer-able and sheer enough not to sink into fine lines. With a built in brush you can target those troublesome areas easily.
$40

DON'T...
OVER powder! 
Many older women get freaked out if I pull out a loose powder to set their makeup. They truly believe that no powder should be used...
And while yes, powder can settle into fine lines, it really depends on the type of powder and how much you're using. That's why I always tell my mature women clients to stay away from powder foundations (the lack of moisture in the skin leaves the foundation sitting on top, making it look chalky and obvious).

Powder: Avoid emphasizing what you're trying to tone down by using a finely milled loose powder like...

Shiseido Translucent Loose Powder:

*photo c/o shiseido.com

This invisible powder melts into skin and compliments every skin tone.
Apply lightly with a fluffy brush to areas that need setting (usually the T-zone and a little under the eyes).

DON'T ...
Be afraid of color! 

As we get older we lose a lot of color in our cheeks and lips.


The best way to add that youthful appearance back is to incorporate color into your makeup routine. Use a lip tint, and don't forget to add blush to those cheeks! And just because you're over 50 doesn't mean you have to own a neutral eye palette! You can still pull off greens, and golds, and violets if you want.


I love this look on a Mother of the Bride I had a few years back. We incorporated golds and deep purples on her eyes with a pop of lip color! 

Some things to keep in mind... 

*When playing with color...
 Remember to keep a balance. Color can be tricky at any age! So really pay attention to what speaks to you-- trust me, you know more than you think! Go with your gut on this and have fun with it! The more you play, the more you learn! 

*When playing with metallics... 
Try to keep shiny, shimmer, and metallic shades away from crepe-y or wrinkled areas of the eyes/skin. The bright texture will only call attention to them. Try to pick an area of the eye where skin is taught. 

*When lining your eyes... 
Focus on softening the liner as you get older. Use less harsh blacks and move into navy's, grey's or brown's. 
A great tip is to use a pencil or gel and top with a shadow to soften any harsh lines. As we get older, our features tend to soften, and with that, so must our makeup. 

I hope this post was helpful for you! If you have some favorite tips, or additional questions, please feel free to share in the comments section!

In the meantime, take the time to love the skin you're in and work with your best features!


Sunday, April 3, 2016

Brow Up Keep

Recently I've been hearing from a lot of talent and clients about how hard it is to keep up with their brows.

So I figured it'd be a good idea to share some easy ways to keep up with your brow growth with some tricks and tips-- as well as laying out your options :) 


Something to keep in mind... DON'T FOLLOW THE TRENDS! That's how the women of the 90's ended up with pencil thin brows (some of which never grow back!). The best thing to do with your brows is to go with what nature gave you. Appreciate what you have-- Learn to love what you have and how to make it look great! 

So be sure that when you're at your brow appointment or plucking at home, that you look at your natural growth and arch. Follow that lead and you'll be safe :) 

Your options... 

1. Plucking. 

Obviously we all know about plucking your brows. Some of you may know it too well if you grew up in the 90s, plucking away the majority of those babes!
Some great tips for plucking at home... 
*Pluck right after you shower: Your pores open up and your everything softens, so plucking is less painful! 
*Try to pluck strays every week: Once you have them shaped the way you like, the best way to keep up with your brow growth is to make it a regular habit. So many clients I know wait until it's unbearable and angrily pluck quickly-- which may cause over plucking. If you just pluck a stray here and there, you won't lose that shape you worked so hard to perfect and you won't have any accidents. Plus, it takes 2 minutes. 
2 MINUTES! 
Why not save the time? 

2. Waxing.

Another age old tradition of hair removal, waxing is readily available! While this is not my favorite method, many people still prefer it as the results last a little longer.
What to keep in mind... 
*Find the right person: Do your research! Find someone who has a good reputation and who's work you love! I've heard too many stories about going to a random shop/salon to wax their brows and having chunks removed, destroying their beautiful brows. These babies frame your face and you want the best of the best!

*Tell them what you want: Be sure to communicate exactly what you want. You need to be sure that you and your brow expert are on the same page.

*At home kits: There are some easy at home kits you can buy for waxing-- while this is not something I'd suggest, there is one kit I don't mind recommending...

Sally Hansen Wax Strip Kit
$5.99 at Ulta

I've personally used this kit for brows and upper lip and it's super easy! It's great if you're in a pinch and need a quick clean up. Just warm the strips between your hands, pull apart, apply and pull! I wouldn't suggest this as a regular form of removal.

3. Threading.

A favorite amongst many! Threading is a form of hair removal that involves, well, thread (duh). It's a form of hair removal that started in Asia many many years ago! It removes hair a little more precisely than waxing as there is more control. It's also much gentler on the skin than waxing or plucking as it doesn't pull at the skin. It's quick and efficient.

Of course... 
*Be clear: As stated above, communicate what you want! Do you want to shape more? Want to thin them out? By how much??
While this form of removal is more precise than waxing, you want to make sure you and your expert are on the same page.

*Don't use a brow razor: You may have to stagger your threading appointments due to budget/time. So in the meantime, you may have to clean up random strays/outgrowth that appears between appointments. Be sure to only do so with tweezers rather than those little razors. Using these can lead to ingrown hairs-- which are not fun!


So there you have it!
I hope this was helpful to you on your brow journey! I cannot stress to you as a makeup artist how important the brows are in your makeup routine :) So take care of them!


Sunday, March 13, 2016

Spring Cleaning!

A great way to keep your makeup stash up to date is to do it seasonally... 

When the seasons change many often clean out other aspects of their lives. Change out your clothes in your closet, do a major house cleaning and some may even do a cleanse :) 

So why not incorporate this into your seasonal routine?

Many clients and friends are guilty of never tossing old makeup! 
They hold onto it because they love the product so much that they want to get every last drop, or it's a product that's been discontinued and they are savoring it.. for 10 years! Sometimes you just feel guilty for tossing an expensive product that didn't work out for you... 

It happens! 
Make up is all about trial and error. How else will you know if something is going to work for you if you don't try it? Just remember that you can always exchange/return it! Most beauty suppliers are great about that... cough cough.. Sephora ..cough... cough... 

So here it is, a quick how to on cleaning out your makeup stash. 

Step 1: 
Take everything out and lay it in front of you. 

Okay, I stole this from the Kon-Mari Method.... But it truly works! 
With makeup it's easy to continually purchase small items without realizing you already have one that's similar or even the same product that isn't empty yet! So to avoid that in the future, take out all your products in one area-- you can categorize them to be even more organized, ie; eyes, lips, face, etc.

Step 2: 
Analyze by date of purchase. 

A good rule of thumb to help you know if you should toss an item is to recall when you purchased the item. If you can't remember, you may need to toss it! So pick up that mascara and think back to when you first opened it... has it been a week? A month? 6 months?? <--toss!!!
*side note: mascara for personal use (not professional) can be kept 3-5 months*
Maybe you pick up an item that you've held onto for years and realize that you don't use it. This is the perfect opportunity for you to find out!

Step 3: 
Do you use this? 

So often we hold onto items because we feel guilty about throwing them away. But do you use said item? Is it something  you actually like? 
If you can't remember the last time you wore it or even like the product anymore, throw it out!
It's taking up space that you could use to purchase new, more glorious makeup products!
Can't bear to part with something you maybe used one time? Give it to a friend! Every time I clean out my makeup stash or brushes, I can usually find someone who wants them. That way you don't feel as terrible about tossing something that's still in good use.


Step 4: 
Wipe down/clean up what you keep. 

Take this time to wipe down your palettes! You want to keep your products and the space they are stored, clean. So take a baby wipe, or a wet paper towel and gently wipe down all your products. Be sure to wipe down all surfaces as well. This should be made into a habit to prevent big messes and bacteria from spreading :)


There you have it- your step by step guide to cleaning out your makeup bag. I hope this was helpful and if you have any other tips, ideas, or questions-- feel free to leave them in the comments section!


Sunday, January 31, 2016

2016 SAG Awards

If you know me at all, you know that I'm obsessed with award shows... More-so red carpets ;)

I love to see how stars get dolled up for their big night out. From the gowns to the shoes, and of course their hair and makeup! I can't wait to see how their team of stylists have paired together their look. 

So here they are, my top 5 picks from this years SAG Awards...

Emilia Clarke 


Photo c/o popsugar.com.au


photo c/o glamour.com

First of all, I love her! 
I'm completely obsessed with the Game Of Thrones series! 
Second, she looked so effortlessly stunning! Her bright pink ball gown with a plunging neckline was so simple and chic. I love that she paired it with such a relaxed/natural hairstyle. The deep side part was a great way to offset the neckline, and those soft, beachy waves were the perfect compliment. Her makeup was kept soft with subtle highlights on her cheeks and eyes-- accompanied by a graphic liner and soft pink lip, I think she nailed this look. 

Alicia Vikander

Photo c/o Vogue.com


photo c/o glamour.com

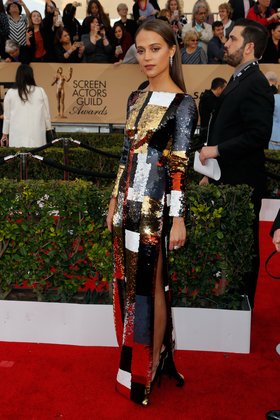
This award winner was stunning! I loved the styling on this one-- her dress is amazing (SEQUINS!!), from the gentle sparkle of the sequins to the graphic print of the dress, it was so eye catching and fun, yet glamorous. 
I really loved the way she paired this dress with a simple hairstyle- sleek and straight. It wasn't overly complicated and kept with the simplicity of the design. Her makeup was amazing, but how could it not be when Charlotte Tilbury is the artist?! 
Those bronzed/gold eyes accompanied with lashes were a great compliment to the hair and the dress. It was soft, simple and showcased her natural beauty. Finishing off with a  soft rose colored lip and bronzed skin-- this is a winner all around. 


Laverne Cox

photo c/o eonline.com

photo c/o glamour.com

Wow. 
Laverne looked awesome last night! I am obsessed with this drapey, grecian, deep burgundy dress! The color on her is perfect, especially against those long, loose blonde waves. It was an updated old hollywood hairstyle, with the deep side part and softened waves. Her makeup complimented beautifully. Soft smokey eyes to add some definition and some extra sultry/sexy-ness to the look (as if she needed more!) and a bold lip that didn't distract from the whole look. She looks glamorous and timeless. 

Christina Hendricks

photo c/o stylebistro.com

photo c/o glamour.com

This girl knows what works. 
I love that she plays up that 1960's vibe with Bridget Bardot hair and sultry cat eyes. Her hair is perfect-- I'm kind of obsessed! Her soft bangs, and loose hair tendrils to accent the volumized updo is perfection. 
That liner is AMAZING
It not only makes her blue eyes pop, but it really is a perfect cat flick that can accompany those deco earrings, Bardot bangs, and that gorgeous, fitted gold dress. 
YES! YES! YES! 

Saoirse Ronan

photo c/o express.co.uk

photo c/o glamour.com

There were quite a few top knots on the red carpet last night, but this one takes the cake! I love that her bun has some volume and is left on the messier side. It was a simple and chic way to pull the hair off her face without making the dress feel too stiff or too formal. She's a young woman and I think the hair reflected a bit of that fun youth! 
Her makeup was awesome. I love the pale shadow on the eyes- it keeps the look fresh and ethereal. The lack of liner and the boost in the lashes were a great combo for this overall look. She kept the lips natural and had a beautiful soft color added to the cheeks. 
I love the dress! The color is great with her tones and it has a modern vibe yet kind of reminds me of the 60's :) 


Who were your top beauty picks of the night?


Sunday, January 10, 2016

2016 Golden Globes

It's finally here! 
AWARD SEASON! 

To start the new year right, let's recap some of the best looks from the Golden Globes Red Carpet. 

Kirsten Dunst


I was wow'd by her! 


I think her entire look was perfection- the soft messy bun was a perfect match for this sexy dress and sultry eye makeup. Pairing it with these gray smokey eyes was truly a match made in heaven, especially for her baby blues :) 
I love that she wasn't given a nude lip, but a soft, matte pink lip color. It was the perfect pop of color without being overbearing. 

Uzo Aduba


I mean... 


She looked beautiful! 
Her skin was luminous with a soft touch of color on her cheeks. Her eyes were a great match for her fun sparkly dress. Black rimmed eyes added drama without taking over the entire look. Her lip color, a soft bit of color to brighten the face. PERFECT! 
I am also obsessed with her wavy bob. It is so refreshing and expertly executed. 

Sophia Bush


I couldn't NOT go with her... 

She was one of the first that I took notice to on the red carpet. Her look was so elegant, and chic-- plus I had to show some love to the Chicago PD Actress :) 
She kept her hair and makeup very classic and clean to go with her sleek dress. Clean, bright eyes set up the perfect canvas for her bold red lip. I absolutely LOVED her sleek (and tiny!) ponytail with the deep side part. It was clean, modern and just perfection. 

Melissa McCarthy


I truly thought Melissa looked beautiful. There have been some red carpets in the past where I wasn't a huge fan of her styling, so I had to include her on this list because she did it RIGHT this time! 
Her hair was soft and natural with loose waves that softened the face. She accompanied that with more natural makeup, some lashes and a natural pink lip. 
It was a great compliment to her sparkly dress and jewels, any more glitz in her makeup and it would have been overkill! 


There were SO many great makeup and hair looks from the Golden Globes this year that it was REALLY tough to narrow it down. 
Some other beauties who I think did it right... 


From Left to Right & Top to bottom: 
Taraji P Henson, Rosie Huntington Whitely, Jane Fonda, Jenna Dewan Tatum, Lady Gaga. 

What a fun red carpet and great start to the season! Tell me who your favorites were of the night and what were your favorite trends? 

Until the next one... 

*all photos c/o E! , hollywoodlife.com 

Sunday, December 27, 2015

Sequins and Glitter and Sparkles, Oh My!

That's right, it's that time of year again when we can get away with all the glitter and lashes we want! It's New Years Eve!!!

I love love love getting ready for NYE. It's the perfect opportunity to really go outside the box with your makeup routine and try something truly eye catching. I try to change it up year to year.. Just to recap...
*pardon the poor lighting/photos*
2011


I went with a gold glitter eye with cat liner and big wispie lashes! I polished it off with a classic, matte red lip :) 


2012


I worked in a different color palette for 2012-- Using silvers and opalescent glitter on the eyes, a smokey black liner and glossy red lips. 

2013


The year our heat went out during a big snow storm... ie; no time for makeup! Simply added a red lip out the door! 

2014


This one may be my favorite! I went for an electric blue cream shadow that I topped with blue/green glitter, all around my eyes. I tight-lined with a black liner for added definition and of course big lashes! I kept the lips soft and natural. 

So what does ringing in 2016 bring to the table? So many options! Here are some fun product suggestions if you're still undecided...

Start small... 

Not ready to jump into the disco lids?! Try starting with small details like this Heavy Metal Glitter Eyeliner from Urban Decay


*image c/o Ulta.com

They come in a variety of colors so you can coordinate and personalize :) One swipe of this will escalate your regular makeup routine to top notch New Year fun. 
The best part about this? No additional adhesives required! It's a great way to get that holiday flair without the extra fuss. 

Glitter Shadows... 
Before diving into the loose glitters, you can always start with a metallic or shimmer shadow. Bobbi Brown's Sparkle Eyeshadows have some beautiful metallic/neutral shades... 


*photos c/o Sephora.com
Colors (L toR): Sunlight, Allspice, Mica

If you're looking for some more color options, try Urban Decay Moondust Shadows


*photos c/o Urbandecay.com
Colors (L to R): Intergalactic, Scorpio, Shockwave


These shadows are a great way to add an understated sparkle. Pop on your lids and add a dark liner and lashes to get that extra drama! 

Die Hard Glitter Fans... 
Like myself :) 

Most of you know Makeup Forever is one of my FAVORITE makeup brands! They have an amazing artist line and have a killer glitter selection! From Subtle to outrageous, you can find one that works for you! 

They have a wide assortment of colors in their fine grade Glitters

*Photo c/o Makeupforever.com
Colors (Top, L to R): N5 Blue, N14 Orange, N7 Red

These fine grade glitters are beautiful topped over eyeshadows! They add sparkle and dimension to a regular eye shadow (see 2014 New Years Eve Makeup Above!)
They can even be used on the lips and body :) 

If you want some really crazy, fun glitter, be sure to check out Makeup Forever's Graphic Glitters and Star Glitters

How to... 
Wondering how to adhere that glitter so it will last you through your night of dancing and drinking champagne? Try this amazing Glitter Glue from Too Faced

*Image c/o Toofaced.com

It's waterproof, creaseproof and holds glitter and shimmer for 24 hours. I have always used their Shadow Insurance Primer to lock down shadows and it works amazingly well. So if you need a way to apply your glitter that isn't uncomfortable, or too sticky, give this a try! 


I hope this inspires you to try something daring this New Years Eve! Remember, it should be fun, festive and full of sparkle :) 
Share your NYE look in the comments section- I'd love to see what inspired you. 


Have a Great New Year's Eve, and be safe!