Monday, May 2, 2016

Eye Shadow Primer

Hi lovelies! 

So something recently came to my attention while working at a wedding this weekend. I had a bride who was concerned at our makeup preview about the eye makeup staying on. She claimed, no matter how much eye primer she puts on, her eyeliner still travels! 

Sound familiar?? 

If this is you, look no further. I'm here to help! 

Some of you may be thinking, what is an eye primer?? 
While others may swear by it (I'm one of those!), let me tell you everything you need to know about this product and how to assure that it WILL work! 

1. What is an Eye Primer?

An eyeshadow primer is a great great product that is used as a base for your eyeshadow. I think this is such a wonderful tool in your kit if you need long wearing eye makeup. It helps to lock shadows in place as well as prevent moving, smudging, creasing and increases longevity. 

The part that gets complicated is what products you are pairing with the primer. My bride claimed she used the primer but still had her eyeliner move on her! No matter how much primer she used, she still ended up with the liner at her crease.... which brings me to... 

2. Use the right products.

Turns out, my bride uses an eyeliner crayon. 
Anything that is super creamy can still move and crease, even with the primer. While it may be less moving or creasing, it can still happen over a long period of time. 

So to prevent that, you can try topping it with an eyeshadow of the same color to lock it in. Or you can opt for a different type of liner. 
Gels are wonderful! 
*and my favorite!* 
They are so versatile, you can create a smooth clean line with them or smudge them out for a soft, smokey eye. The best part about them is that they are waterproof and won't budge once they are set. Liquids and long wearing pencils are great too :) 

3. Which primers work? 

There are a couple brands that have great eye primers! Some even come in a shade or with some iridescence-- which I've used if I'm in a hurry and want to brighten my eyes. 

Here are my favorites... 

Too Faced Shadow Insurance
$20
*Photo c/o HSN.com

I've been using this stuff for years! I use it for all my clients, of all skin tones and it works wonders! Nothing travels, moves, or creases with this stuff. A small dollop goes a long way- be sure to apply a thin layer and you're good to go. They also have a couple versions, one for glitter, one with shimmer, etc. But the classic is great. 

Urban Decay Eyeshadow Primer Potion
$20
*Photo c/o urbandecay.com

This is another great no budge primer! They have a few different shades that work beautifully. Sometimes, on my lazy days, I'll take their shadow primer in Minor Sin and apply it all over my lid to brow-- follow with some mascara and call it a day! It's perfect for warm weather days when you just need a quick pick me up without breaking out the shadows and liners! 

Aside from my lazy hack ;) This stuff works wonderfully at holding things in place all day. 


I hope this helped you to understand eye shadow primers and their importance/role in the makeup world! If you have a favorite primer, feel free to share in the comments! 


Monday, April 25, 2016

All is a glow...

Something I love is a good highlighter. 

It's a great way to make you feel refreshed, awake and very pretty.
You want to look glowy not sweaty with a soft shimmer not glitter!

I've been playing around with lots of different types of highlighters and I've rounded up my favorites just in time for the warmer seasons. 

Becca Shimmering Skin Perfector
$41
($19 for a travel size)

*photo c/o beccacosmetics.com

This stuff... 

While assisting the fabulously talented Gucci Westman, I learned quickly that she loved to use this highlighter for the face and the body. And with good reason... 

This is such a beautiful product. The sheen is subtle, but catches the light beautifully. Pop it onto your cheekbones for that instant glow. They offer 5 different shades, from white opal, to golden to blush toned. So whatever your skin tone, you can find the perfect compliment! 


Josie Maran Argan Enlightenment Illuminizer
$26
*photo c/o josiemarancosmetics.com

Another great liquid highlighter!
This is more gold toned so it will work on many skin colors. It has a soft glow without being overpowering. Another perk to this, is Josie Maran's products are all cruelty free, and chemical free. Can't beat that!


Mary Lou-Manizer
$24

*Photo c/o Kohls.com

Want a quick powder highlight? Try this one from The Balm Cosmetics. I do love this illuminator. It has a little more punch to it, but blends out beautifully. I love to pop this one on my cheekbones, and inner corners of my eyes. It's a great option to keep in your makeup bag for a quick pick me up, and the packaging is so cute!

RMS Living Luminizer
$38
*photo c/o RMSbeauty.com

Here is a gorgeous cream highlight.
This little pot of product will go a long way. The beauty of the RMS living luminizer is how subtle it is. It literally just looks like your skin is naturally catching the light! Which is exactly what you want! Another perk of the cream is that it is great for portability.


There you have it, my favorite illuminators. Give 'em a try and let me know what you think in the comments!


Sunday, April 17, 2016

MAC Masterclass Brush Review

Hey all,

Thank you for your patience-- this month has been insane work wise, so I've neglected a weekend or two of blogging... 
But to get back on track I thought it'd be fun to share my new purchase and review with you! 

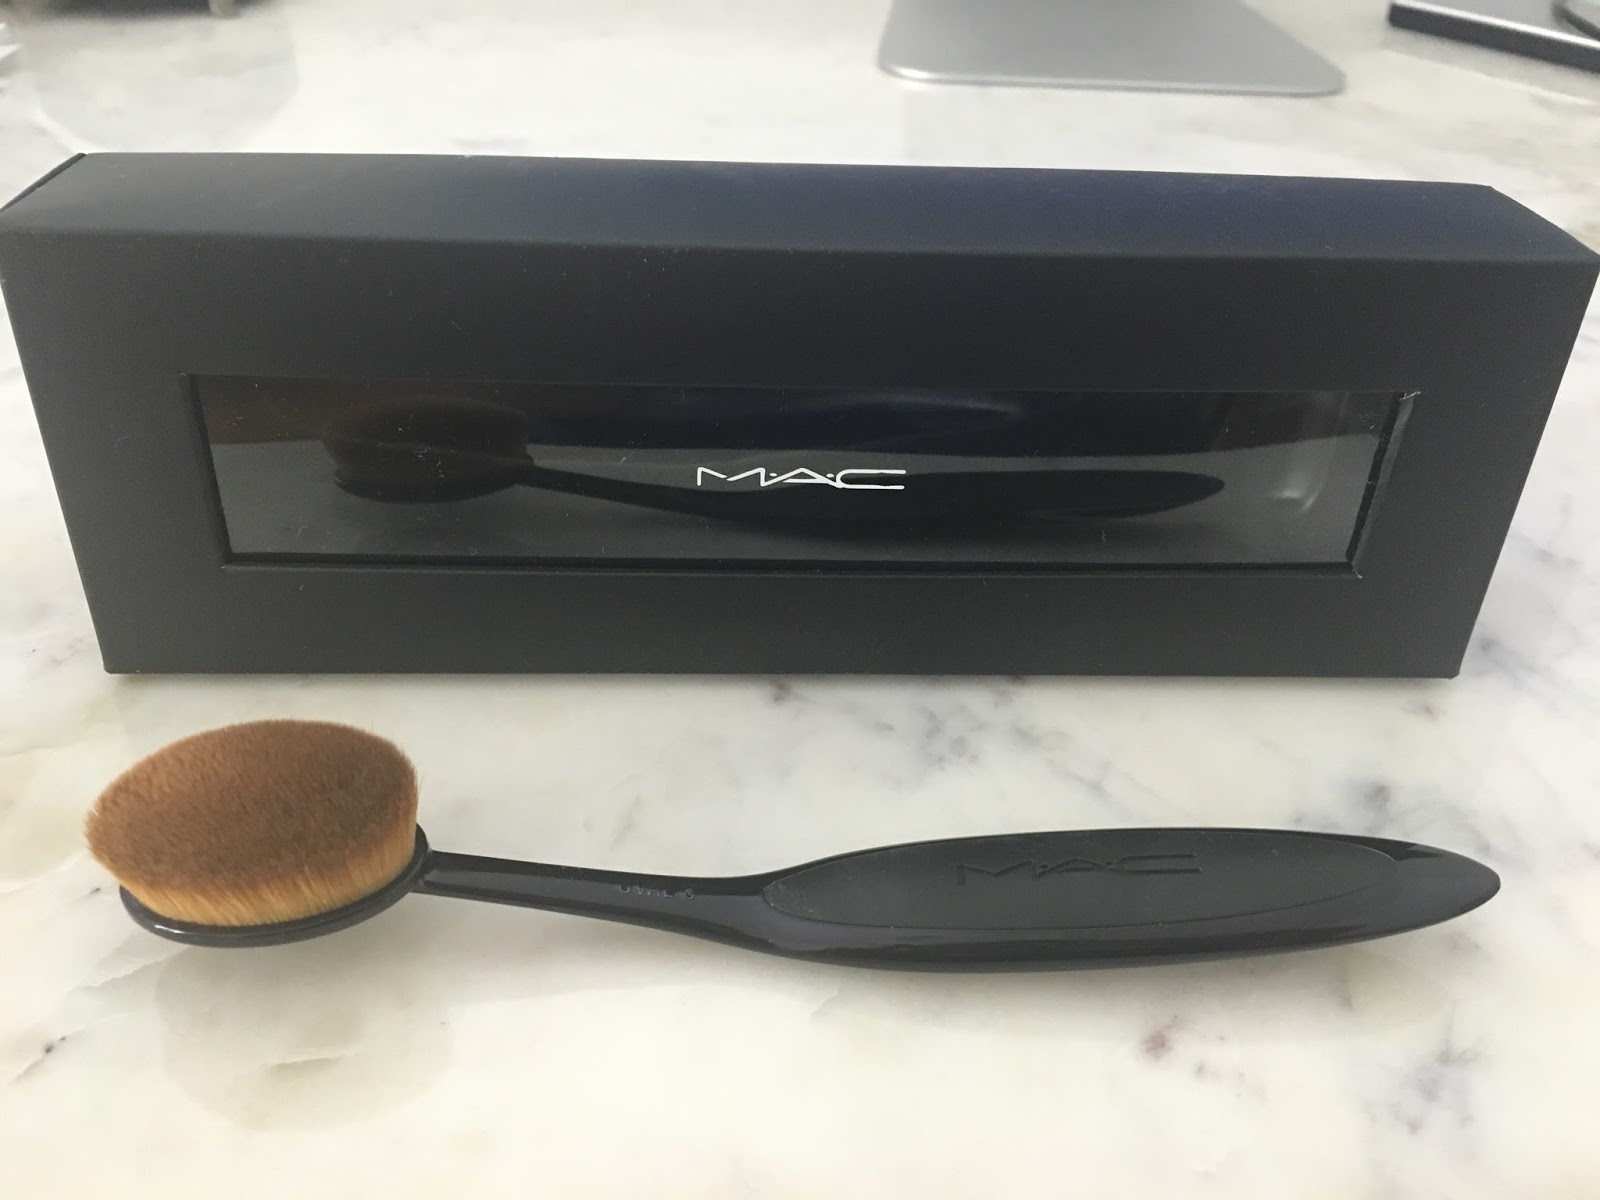
Here it is... 


This is not a scam! lol 

I have had my eyes on the original brushes by Artis for some time. I kept going back and forth about purchasing them because A) I truly thought they were a weird fad B) I didn't want to re-learn how to use brushes...  C) I just wasn't sure if it would be worth the price tag. 

But alas, here's what happened...

I wandered into the MAC store to pick up an item or two and saw the brush out on display. I asked the sales associate if I could try it out. She gave me a bit of concealer and I dipped the brush in and started buffing it into the skin.


Holy moly. The bristles are SO soft! 
They feel amazing against the skin and it really does give a nice finish to the foundation/concealer. I couldn't believe how much I actually liked this brush! And I couldn't believe I was going to purchase it without an artist discount (it's one of their special products that doesn't apply for pro discount= lame). But I really liked the way it felt on my skin, so I purchased the largest one they had for myself to try it out for a while. 

They have 3 sizes, a small liner brush, a small shadow/concealer brush and the larger foundation brush. The Artis Brushes have a wider range of sizes, including much larger ones and different shaped smaller ones. 

While I do think the smaller ones are a "fad" and won't really get much traction, I do think the larger ones are quite nice! 

Part of the reason I like it so much is because I can use it for a lot of different things. Moisturizer, foundation, concealer, cream blush, highlighter, you name it! I can buff it on! The size is quite nice (it's probably a size 4 or 6 in Artis), it can work for full face stuff, but it can also fit under my eyes and around my nose for extra coverage/concealing. 


It gives a seamless finish, almost like airbrush. No brush strokes or fingerprints to worry about. 

It's got a sturdy handle that's comfortable and easy to use. 

I don't think I'll be purchasing the smaller detail brushes for eyes/liner, etc. But I am really enjoying this larger face brush and might purchase one or two for my kit! 

If you've tried them, let me know what you think! 


Sunday, April 3, 2016

Brow Up Keep

Recently I've been hearing from a lot of talent and clients about how hard it is to keep up with their brows.

So I figured it'd be a good idea to share some easy ways to keep up with your brow growth with some tricks and tips-- as well as laying out your options :) 


Something to keep in mind... DON'T FOLLOW THE TRENDS! That's how the women of the 90's ended up with pencil thin brows (some of which never grow back!). The best thing to do with your brows is to go with what nature gave you. Appreciate what you have-- Learn to love what you have and how to make it look great! 

So be sure that when you're at your brow appointment or plucking at home, that you look at your natural growth and arch. Follow that lead and you'll be safe :) 

Your options... 

1. Plucking. 

Obviously we all know about plucking your brows. Some of you may know it too well if you grew up in the 90s, plucking away the majority of those babes!
Some great tips for plucking at home... 
*Pluck right after you shower: Your pores open up and your everything softens, so plucking is less painful! 
*Try to pluck strays every week: Once you have them shaped the way you like, the best way to keep up with your brow growth is to make it a regular habit. So many clients I know wait until it's unbearable and angrily pluck quickly-- which may cause over plucking. If you just pluck a stray here and there, you won't lose that shape you worked so hard to perfect and you won't have any accidents. Plus, it takes 2 minutes. 
2 MINUTES! 
Why not save the time? 

2. Waxing.

Another age old tradition of hair removal, waxing is readily available! While this is not my favorite method, many people still prefer it as the results last a little longer.
What to keep in mind... 
*Find the right person: Do your research! Find someone who has a good reputation and who's work you love! I've heard too many stories about going to a random shop/salon to wax their brows and having chunks removed, destroying their beautiful brows. These babies frame your face and you want the best of the best!

*Tell them what you want: Be sure to communicate exactly what you want. You need to be sure that you and your brow expert are on the same page.

*At home kits: There are some easy at home kits you can buy for waxing-- while this is not something I'd suggest, there is one kit I don't mind recommending...

Sally Hansen Wax Strip Kit
$5.99 at Ulta

I've personally used this kit for brows and upper lip and it's super easy! It's great if you're in a pinch and need a quick clean up. Just warm the strips between your hands, pull apart, apply and pull! I wouldn't suggest this as a regular form of removal.

3. Threading.

A favorite amongst many! Threading is a form of hair removal that involves, well, thread (duh). It's a form of hair removal that started in Asia many many years ago! It removes hair a little more precisely than waxing as there is more control. It's also much gentler on the skin than waxing or plucking as it doesn't pull at the skin. It's quick and efficient.

Of course... 
*Be clear: As stated above, communicate what you want! Do you want to shape more? Want to thin them out? By how much??
While this form of removal is more precise than waxing, you want to make sure you and your expert are on the same page.

*Don't use a brow razor: You may have to stagger your threading appointments due to budget/time. So in the meantime, you may have to clean up random strays/outgrowth that appears between appointments. Be sure to only do so with tweezers rather than those little razors. Using these can lead to ingrown hairs-- which are not fun!


So there you have it!
I hope this was helpful to you on your brow journey! I cannot stress to you as a makeup artist how important the brows are in your makeup routine :) So take care of them!


Sunday, March 20, 2016

Spring Favorites

It's finally here...

The first day of Spring! 
I'm so ready for warmer weather, fresh bloomed trees and bright spring colors!!

I figured what better way to greet this new season than to share my favorite Spring collection of products?! Especially since I know you all did your spring cleaning of your makeup bags ;) 

So here they are, my favorite products for Spring.

Just peachy... 

If you haven't been paying attention, let me tell you that Peach is making a big comeback. Peachy eye shadow and blush tones are HUGE this season! For good reason too-- they are soft, pretty and come in a great range to suit every skin tone. 
Check out this great palette from Anastasia...
This kit is beautiful. You can use it for your eyes, cheeks, face, whatever! It's warm bronze tones as well as soft peachy tones that work so beautifully together. Get this and you'll need nothing else for your Spring/Summer makeup routine! 

Bright and Bold...

If color doesn't scream Spring, I don't know what does! I love to bust out bright lips this time of year. It helps to pull me from my winter slump and brighten my whole face. Some favorite hues for this Spring include.. 

This color is bright, fun, and ties in wonderfully with those peachy tones :) The lipstick is lightweight and hydrating, keeping application easy and addictive. 


This fun pink is softer in color, but makes just as much of a statement! It's creamy texture is exactly what your lips need after this winter! A great color for daytime shopping to evening cocktails, it's fun, flirty and playful. 


Glowing Skin...

Let's be honest, this never goes out of season for me! But it is a big trend this season (and probably my favorite!) Everyone wants that dewy, glowing skin, and there are some tricks to achieving that look. One new product on the market just made your life way easier.... 


This is a great way to scale back on your makeup routine and focus on clean skin. It's a hydrating moisturizing cream that you apply all over your skin, and then you follow it with their highlighting cream that you can apply with your fingers to high points on the face (ie; brow bones, cheekbones, nose, etc). It gives you an instant boost of hydration (which your skin needs right now!) and adds a subtle highlight and shine. It's as if your skin has been refreshed! 

Give these products a try and let me know what you think! I love to see your Spring looks :) 


*Photos c/o Sephora.com, bobbibrown.com and Dolcegabbana.com

Sunday, March 13, 2016

Spring Cleaning!

A great way to keep your makeup stash up to date is to do it seasonally... 

When the seasons change many often clean out other aspects of their lives. Change out your clothes in your closet, do a major house cleaning and some may even do a cleanse :) 

So why not incorporate this into your seasonal routine?

Many clients and friends are guilty of never tossing old makeup! 
They hold onto it because they love the product so much that they want to get every last drop, or it's a product that's been discontinued and they are savoring it.. for 10 years! Sometimes you just feel guilty for tossing an expensive product that didn't work out for you... 

It happens! 
Make up is all about trial and error. How else will you know if something is going to work for you if you don't try it? Just remember that you can always exchange/return it! Most beauty suppliers are great about that... cough cough.. Sephora ..cough... cough... 

So here it is, a quick how to on cleaning out your makeup stash. 

Step 1: 
Take everything out and lay it in front of you. 

Okay, I stole this from the Kon-Mari Method.... But it truly works! 
With makeup it's easy to continually purchase small items without realizing you already have one that's similar or even the same product that isn't empty yet! So to avoid that in the future, take out all your products in one area-- you can categorize them to be even more organized, ie; eyes, lips, face, etc.

Step 2: 
Analyze by date of purchase. 

A good rule of thumb to help you know if you should toss an item is to recall when you purchased the item. If you can't remember, you may need to toss it! So pick up that mascara and think back to when you first opened it... has it been a week? A month? 6 months?? <--toss!!!
*side note: mascara for personal use (not professional) can be kept 3-5 months*
Maybe you pick up an item that you've held onto for years and realize that you don't use it. This is the perfect opportunity for you to find out!

Step 3: 
Do you use this? 

So often we hold onto items because we feel guilty about throwing them away. But do you use said item? Is it something  you actually like? 
If you can't remember the last time you wore it or even like the product anymore, throw it out!
It's taking up space that you could use to purchase new, more glorious makeup products!
Can't bear to part with something you maybe used one time? Give it to a friend! Every time I clean out my makeup stash or brushes, I can usually find someone who wants them. That way you don't feel as terrible about tossing something that's still in good use.


Step 4: 
Wipe down/clean up what you keep. 

Take this time to wipe down your palettes! You want to keep your products and the space they are stored, clean. So take a baby wipe, or a wet paper towel and gently wipe down all your products. Be sure to wipe down all surfaces as well. This should be made into a habit to prevent big messes and bacteria from spreading :)


There you have it- your step by step guide to cleaning out your makeup bag. I hope this was helpful and if you have any other tips, ideas, or questions-- feel free to leave them in the comments section!


Sunday, March 6, 2016

Deodorant Free...


I gave up wearing deodorant two years ago, and let me tell you, it's not as stinky as you'd think :) 

I've always had an awareness of what I put on and in my body. 
I never used antiperspirants, you need to sweat- it's your body's way of cooling off. So restricting your body of this with chemicals, was definitely not an option. 

I used commercial deodorants for years in my youth- paranoid about smelling, or sweating. But as I've gotten older, you learn to accept that this is a natural body occurrence. 
It's healthy. And honestly, who cares? Everybody sweats! 

Obviously I don't want to smell bad, but I also don't want to douse my body in chemicals. Especially in such a delicate area of the underarms.

And so the search for the perfect natural deodorant began...
I tried a handful of different brands from sticks, to gels to powders and none of them I fell in love with. They were either too sticky, or I didn't like the smell, or they stung my underarms after shaving.

Now I've always been one for home remedies (diy face masks anyone?!), so I thought I'd investigate homemade deodorants.

And guess what?
I found a recipe that WORKS!
It's such an easy recipe and it most certainly does the trick. It's 3 ingredients (most of you may have them at home already) and you can add essential oils for a scent if you desire.

Here's the Recipe:
6 tablespoons of Coconut Oil
1/4 cup of Baking Soda
1/4 cup of Arrowroot Powder or Cornstarch (I've tried both and they worked the same)
Essential Oils (optional)
*recipe c/o wellnessmama.com

Just mix the ingredients above until you get a creamy consistency. I put mine in an old jar and apply a small amount to each arm. Just be sure to keep it in a cool place so the coconut oil doesn't melt!

Some other tips for smelling fresh as a daisy...
Eat Clean. 
ie; lots of greens!
The more processed foods you eat, the stinkier your sweat. Sounds silly, but it's true. The cleaner you eat the less chemicals your body has to get rid of = less sweat and odor.

So while this post is not glamorous, I hope you found it insightful and useful!